list
- 1. list的介绍及使用
- 1.1 list的介绍
- 1.2 list的使用
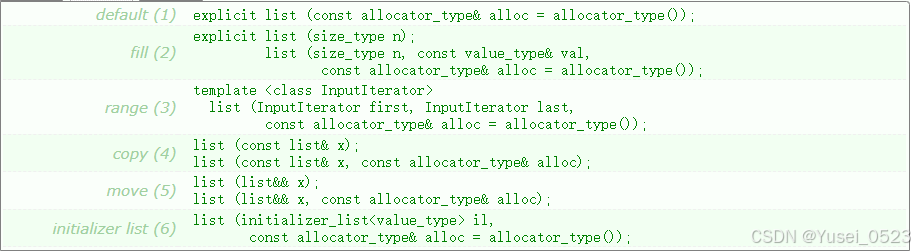
- 1.2.1 list的构造
- 1.2.2 list iterator的使用
- 1.2.3 list capacity
- 1.2.4 list element access
- 1.2.5 list modifiers
- 1.2.6 list的迭代器失效
- 2.1 模拟实现list
1. list的介绍及使用
1.1 list的介绍
1.2 list的使用
1.2.1 list的构造
1.2.2 list iterator的使用
此处,大家可暂时将迭代器理解成一个指针,该指针指向list中的某个节点。


【注意】
- begin与end为正向迭代器,对迭代器执行++操作,迭代器向后移动
- rbegin(end)与rend(begin)为反向迭代器,对迭代器执行++操作,迭代器向前移动
1.2.3 list capacity

1.2.4 list element access

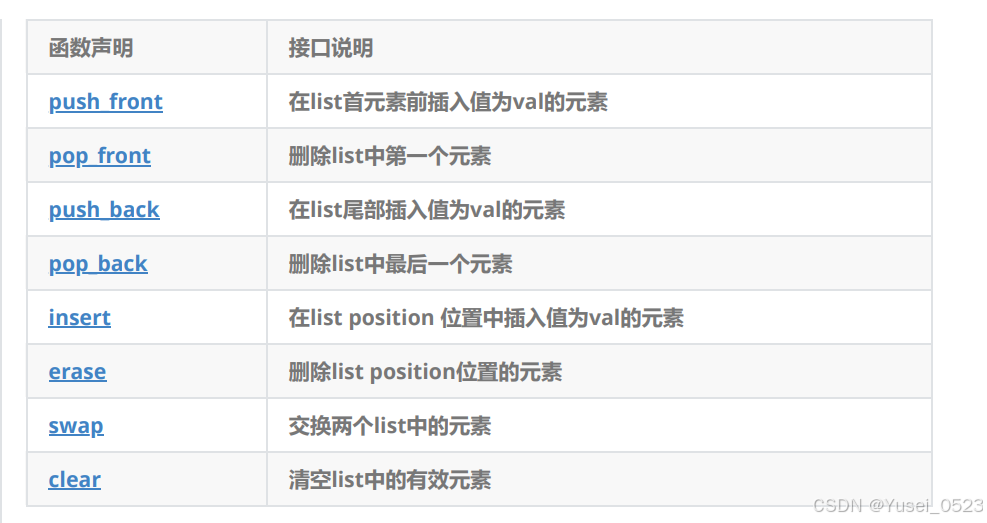
1.2.5 list modifiers
1.2.6 list的迭代器失效
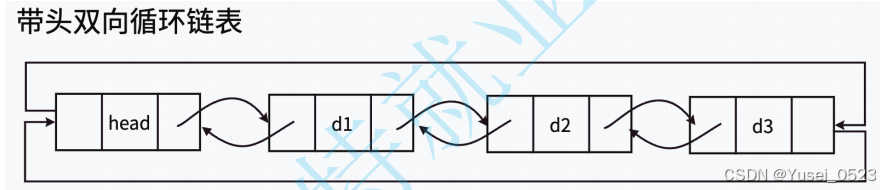
前面说过,此处大家可将迭代器暂时理解成类似于指针,迭代器失效即迭代器所指向的节点的无
效,即该节点被删除了。因为list的底层结构为带头结点的双向循环链表,因此在list中进行插入
时是不会导致list的迭代器失效的,只有在删除时才会失效,并且失效的只是指向被删除节点的迭
代器,其他迭代器不会受到影响。
使用接口
#include<iostream>
#include<algorithm>
#include<list>
#include<vector>
using namespace std;
void test_list1()
{
	list<int> lt;
	lt.push_back(1);
	lt.push_back(2);
	lt.push_back(3);
	lt.push_back(4);

	list<int>::iterator it = lt.begin();
	while (it != lt.end())
	{
		cout << *it << " ";
		++it;
	}
	cout << endl;

	for (auto e : lt)
	{
		cout << e << " ";
	}
	cout << endl;

}
支持迭代器就支持范围for
struct A
{
public:
	A(int a1 = 1, int a2 = 1)
		:_a1(a1)
		, _a2(a2)
	{
		cout << "A(int a1 = 1, int a2 = 1)" << endl;
	}

	A(const A& aa)
		:_a1(aa._a1)
		, _a2(aa._a2)
	{
		cout << "A(const A& aa)" << endl;
	}

	int _a1;
	int _a2;
};
void test_list2()
{
	list<A> lt;
	A aa1(1, 1);
	lt.push_back(aa1);
	lt.push_back(A(2, 2));//匿名对象
}
传参走隐式类型转换
void test_list3()
{
	list<int> lt;
	lt.push_back(1);
	lt.push_back(2);
	lt.push_back(3);
	lt.push_back(4);
	lt.push_back(5);
	lt.push_back(6);

	for (auto e : lt)
	{
		cout << e << " ";
	}
	cout << endl;

	auto it = lt.begin();
	int k = 3;
	while (k--)
	{
		++it;
	}

	lt.insert(it, 30);

	for (auto e : lt)
	{
		cout << e << " ";
	}
	cout << endl;

	int x = 0;
	cin >> x;
	it = find(lt.begin(), lt.end(), x);
	if (it != lt.end())
	{
		lt.erase(it);
	}

	for (auto e : lt)
	{
		cout << e << " ";
	}
	cout << endl;
}
list迭代器只支持了+±-运算符的重载,因此实现+=智能通过++实现
void test_list4()
{
	list<int> lt;
	lt.push_back(1);
	lt.push_back(20);
	lt.push_back(3);
	lt.push_back(5);
	lt.push_back(4);
	lt.push_back(5);
	lt.push_back(6);

	for (auto e : lt)
	{
		cout << e << " ";
	}
	cout << endl;

	// 升序
	// lt.sort();
	// 降序 - 仿函数
	// less<int> ls;
	// greater<int> gt;
	// lt.sort(gt);
	lt.sort(greater<int>());

	lt.reverse();//类方法
	reverse(lt.begin(), lt.end());//算法库实现的

	for (auto e : lt)
	{
		cout << e << " ";
	}
	cout << endl;

	std::list<double> first, second;

	first.push_back(3.1);
	first.push_back(2.2);
	first.push_back(2.9);

	second.push_back(3.7);
	second.push_back(7.1);
	second.push_back(1.4);

	first.sort();
	second.sort();

	first.merge(second);
}
排序时我们使用了一个仿函数,仿函数是一个类可以实现排序时升序还是降序。
merge支持将将两个排序好的链表合并插入到*this中
void test_list5()
{
	list<int> lt;
	lt.push_back(1);
	lt.push_back(20);
	lt.push_back(3);
	lt.push_back(5);
	lt.push_back(5);
	lt.push_back(4);
	lt.push_back(5);
	lt.push_back(6);

	lt.sort();
	for (auto e : lt)
	{
		cout << e << " ";
	}
	cout << endl;

	lt.unique();
	for (auto e : lt)
	{
		cout << e << " ";
	}
	cout << endl;
}
unique实现删除重复元素(在链表排序好的情况下)
void test_list6()
{
	// 一个链表节点转移给另一个链表
	std::list<int> mylist1, mylist2;
	std::list<int>::iterator it;

	// set some initial values:
	for (int i = 1; i <= 4; ++i)
		mylist1.push_back(i);      // mylist1: 1 2 3 4

	for (int i = 1; i <= 3; ++i)
		mylist2.push_back(i * 10);   // mylist2: 10 20 30

	it = mylist1.begin();
	++it;                         // points to 2

	mylist1.splice(it, mylist2); // mylist1: 1 10 20 30 2 3 4
	// mylist2 (empty)
	// "it" still points to 2 (the 5th element


// 调整当前链表节点的顺序
	list<int> lt;
	lt.push_back(1);
	lt.push_back(2);
	lt.push_back(3);
	lt.push_back(4);
	lt.push_back(5);
	lt.push_back(6);
	for (auto e : lt)
	{
		cout << e << " ";
	}
	cout << endl;

	int x = 0;
	cin >> x;
	it = find(lt.begin(), lt.end(), x);
	if (it != lt.end())
	{
		//lt.splice(lt.begin(), lt, it);
		lt.splice(lt.begin(), lt, it, lt.end());
	}

	for (auto e : lt)
	{
		cout << e << " ";
	}
	cout << endl;
}
splice实现粘连可以是一个链表内部的粘连也可以是两个链表去粘连
- 将链表x的所有结点粘连在position之前
- 将链表x中的i结点粘连在position之前
- 将链表x的迭代去区间粘连在position之前

void test_op()
{
	srand(time(0));
	const int N = 1000000;

	list<int> lt1;
	list<int> lt2;

	for (int i = 0; i < N; ++i)
	{
		auto e = rand() + i;
		lt1.push_back(e);
		lt2.push_back(e);
	}

	int begin1 = clock();
	// 拷贝vector
	vector<int> v(lt2.begin(), lt2.end());

	// 排序
	sort(v.begin(), v.end());

	// 拷贝回lt2
	lt2.assign(v.begin(), v.end());

	int end1 = clock();

	int begin2 = clock();
	lt1.sort();
	int end2 = clock();

	printf("list copy vector sort copy list sort:%d\n", end1 - begin1);
	printf("list sort:%d\n", end2 - begin2);
}
链表排序在算法库中实现,不是类方法的一部分。但是对于链表排序最好把list放到vector中排序在调用assign返回给list,在这样的代价下排序的效率也是远高于对list排序
2.1 模拟实现list
要模拟实现list,必须要熟悉list的底层结构以及其接口的含义,通过上面的学习,这些内容已基本
掌握,现在我们来模拟实现list。
#pragma once
#include<assert.h>
#include<iostream>
using namespace std;
namespace Yusei
{
	template<class T>
	struct list_node
	{
		T _date;
		list_node<T>* _next;
		list_node<T>* _prev;
		list_node(const T& date=T())
			:_next(nullptr)
			,_prev(nullptr)
			,_date(date)
		{}
	};
	template<class T, class Ref, class Ptr>
	struct list_iterator
	{
		typedef list_node<T> Node;
		typedef list_iterator<T, Ref, Ptr> Self;
		Node* _node;

		list_iterator(Node* node)
			:_node(node)
		{}
		Ref operator*()
		{
			return _node->_date;
		}
		Ptr operator ->()
		{
			return &_node->_date;
		}
		Self& operator++()
		{
			 _node=_node->_next;
			 return *this;
		}
		Self& operator--()
		{
			_node = _node->_prev;
			return *this;
		}
		Self& operator++(int)
		{
			Self tmp(*this);
			_node = _node->_next;
			return tmp;
		}
		Self& operator--(int)
		{
			Self tmp(*this);
			_node = _node->_prev;
			return tmp;
		}
		bool operator!=(const Self& s)const
		{
			return _node != s._node;
		}
		bool operator==(const Self& s)const
		{
			return _node == s._node;
		}
	};

	template<class T>
	class list
	{
		typedef list_node<T> Node;
	public:
		typedef list_iterator<T, T&, T*> iterator;
		typedef list_iterator<T, const T&, const T*> const_iterator;

		iterator begin()
		{
			return _head->_next;
		}

		iterator end()
		{
			return _head;
		}

		const_iterator begin() const
		{
			return _head->_next;
		}

		const_iterator end() const
		{
			return _head;
		}

		void empty_init()
		{
			_head = new Node;
			_head->_next = _head;
			_head->_prev = _head;
			_size = 0;
		}

		list()
		{
			empty_init();
		}

		list(initializer_list<T> il)
		{
			empty_init();
			for (auto& e : il)
			{
				push_back(e);
			}
		}

		list(const list<T>& lt)
		{
			empty_init();

			for (auto& e : lt)
			{
				push_back(e);
			}
		}

		void swap(list<T>& lt)
		{
			std::swap(_head, lt._head);
			std::swap(_size, lt._size);
		}

		list<T>& operator=(list<T> lt)
		{
			swap(lt);
			return *this;
		}

		~list()
		{
			clear();
			delete _head;
			_head = nullptr;
		}

		void clear()
		{
			auto it = begin();
			while (it != end())
			{
				it = erase(it);
			}
		}

		iterator insert(iterator pos, const T& x)
		{
			Node* cur = pos._node;
			Node* prev = cur->_prev;
			Node* newnode = new Node(x);

			// prev newnode cur
			newnode->_next = cur;
			cur->_prev = newnode;
			newnode->_prev = prev;
			prev->_next = newnode;

			++_size;

			return newnode;
		}

		void push_back(const T& x)
		{
			insert(end(), x);
		}

		void push_front(const T& x)
		{
			insert(begin(), x);
		}

		iterator erase(iterator pos)
		{
			assert(pos != end());

			Node* prev = pos._node->_prev;
			Node* next = pos._node->_next;

			prev->_next = next;
			next->_prev = prev;
			delete pos._node;

			--_size;

			return next;
		}

		void pop_back()
		{
			erase(--end());
		}

		void pop_front()
		{
			erase(begin());
		}

		size_t size() const
		{
			return _size;
		}

		bool empty() const
		{
			return _size == 0;
		}
	private:
		Node* _head;
		size_t _size;
	};

	struct AA
	{
		int _a1 = 1;
		int _a2 = 1;
	};

	template<class Container>
	void print_container(const Container& con)
	{
		typename Container::const_iterator it = con.begin();
		//auto it = con.begin();
		while (it != con.end())
		{
			//*it += 10;

			cout << *it << " ";
			++it;
		}
		cout << endl;

		for (auto e : con)
		{
			cout << e << " ";
		}
		cout << endl;
	}

	void test_list1()
	{
		list<int> lt;
		lt.push_back(1);
		lt.push_back(2);
		lt.push_back(3);
		lt.push_back(4);

		list<int>::iterator it = lt.begin();
		while (it != lt.end())
		{
			*it += 10;

			cout << *it << " ";
			++it;
		}
		cout << endl;

		for (auto e : lt)
		{
			cout << e << " ";
		}
		cout << endl;
		print_container(lt);

		list<AA> lta;
		lta.push_back(AA());
		lta.push_back(AA());
		lta.push_back(AA());
		lta.push_back(AA());
		list<AA>::iterator ita = lta.begin();
		while (ita != lta.end())
		{
			cout << ita->_a1 << ":" << ita->_a2 << endl;
			cout << ita.operator->()->_a1 << ":" << ita.operator->()->_a2 << endl;

			++ita;
		}
		cout << endl;
	}

	void test_list2()
	{
		list<int> lt;
		lt.push_back(1);
		lt.push_back(2);
		lt.push_back(3);
		lt.push_back(4);

		// insert以后迭代器不失效
		list<int>::iterator it = lt.begin();
		lt.insert(it, 10);
		*it += 100;

		print_container(lt);

		// erase以后迭代器失效
		// 删除所有的偶数
		it = lt.begin();
		while (it != lt.end())
		{
			if (*it % 2 == 0)
			{
				it = lt.erase(it);
			}
			else
			{
				++it;
			}
		}

		print_container(lt);
	}

	void test_list3()
	{
		list<int> lt1;
		lt1.push_back(1);
		lt1.push_back(2);
		lt1.push_back(3);
		lt1.push_back(4);

		list<int> lt2(lt1);

		print_container(lt1);
		print_container(lt2);

		list<int> lt3;
		lt3.push_back(10);
		lt3.push_back(20);
		lt3.push_back(30);
		lt3.push_back(40);

		lt1 = lt3;
		print_container(lt1);
		print_container(lt3);
	}

	void func(const list<int>& lt)
	{
		print_container(lt);
	}

	void test_list4()
	{
		// 直接构造
		list<int> lt0({ 1,2,3,4,5,6 });
		// 隐式类型转换
		list<int> lt1 = { 1,2,3,4,5,6,7,8 };
		const list<int>& lt3 = { 1,2,3,4,5,6,7,8 };

		func(lt0);
		func({ 1,2,3,4,5,6 });

		print_container(lt1);

		//auto il = { 10, 20, 30 };初始化列表
	/*	initializer_list<int> il = { 10, 20, 30 };
		cout << typeid(il).name() << endl;
		cout << sizeof(il) << endl;*/
	}
}